
- 1. Introduction
- 2. ProjectForge Setup
- 3. Configuration
- 3.1. Base directory (application’s home)
- 3.2. Configuration file application.properties
- 3.3. Customization
- 3.4. Configuration settings (web interface)
- 3.5. Using ttf fonts for PDF render engine
- 3.6. HTML formatted E-Mail templates
- 3.7. Configuration of Mobile Enterprise Blogging (MEB)
- 3.8. phone calls and texting with ProjectForge
- 3.9. business assessment / BWA
- 3.10. SecurityConfig
- 3.11. LDAP
- 3.12. Troubleshouting
- 4. Maintenance
- 4.1. Updating by simple clicks
- 4.2. Re-indexing the database
- 4.3. Analysing tools
- 4.4. XML-backup and restore and data-base migration ( BUG -→ We guarantee no guarantee, but work on the solution of the problem )
- 4.5. Backup
- 4.6. Restoring a backup
- 4.7. Automatical backup
- 4.8. Monitoring
- 4.9. Scheduler
- 4.10. Uninstalling ProjectForge
- 4.11. Security improvements
- 5. Plugins
1. Introduction
This documents describes the administration of ProjectForge®.
2. ProjectForge Setup
2.1. Database
 1
 2
 3
 4
 5
 6
 7
 8
 9
10
11
12
13
14
15
16
17
18
19
20
21
22
23
24
25
26
27
28
29
30
31
32
33
34
35
36
37
38
39
40
41
42
43
44
#JDBC Java class
spring.datasource.driver-class-name=org.hsqldb.jdbcDriver
#spring.datasource.driver-class-name=org.postgresql.Driver

#Database user
spring.datasource.username=sa

#Database password for given user
spring.datasource.password=

#JDBC url to connect to DB
spring.datasource.url=jdbc:hsqldb:file:projectforge;shutdown=true
#spring.datasource.url=jdbc:hsqldb:mem:projectforge
#spring.datasource.url=jdbc:postgresql://localhost:5432/projectforge
db.ds.projectForgeDs.extendedSettings=false

#Sets the maximum number of active connections that can be allocated at the same time.
#Use a negative value for no limit.
spring.datasource.maxActive=8

#Sets the maximum number of connections that can remain idle in the pool.
spring.datasource.maxIdle=8

# Sets the minimum number of idle connections in the pool.
spring.datasource.minIdle=0

#Max milleseconds waiting while obtaining connection. Use -1 to make the pool wait indefinitely.
spring.datasource.maxWait=-1

#Sets the initial size of the connection pool.
spring.datasource.intialSize=0

#Sets the default catalog.
spring.datasource.default-catalog=

#Sets default auto-commit state of connections returned by this datasource.
spring.datasource.defaultAutoCommit=true

#Validation query to test if connection is valid.
spring.datasource.validation-query=

#Sets the validation query timeout, the amount of time, in seconds, that connection validation will wait for a response from the database when executing a validation query.
#Use a value less than or equal to 0 for no timeout.
spring.datasource.validation-query-timeout=-1
2.2. Initialization, first login and set-up dialogue
After the first start of ProjectForge® you will see ProjectForge®'s set-up dialogue. Please configure at minimum the adminstrator’s password and the target (empty data-base for a productive system or pre-filled with test data). You can configure or change all other settings such as time zone, e-mail addresses etc. any time later.
2.3. SSL / Https
It’s recommended to start ProjectForge on a localhost http port and to handle https over nginx or apache.
For testing purposes you can use the following configuration:
2.3.1. Self-signed certificate
Generate a self-signed certificate:`keytool -genkeypair -alias selfsigned -keyalg RSA -keysize 2048 -storetype PKCS12 -keystore keystore.p12 -validity 365`
2.3.2. Configure the file ~/ProjectForge/projectforge.properties
File: application.properties:
1
2
3
4
5
6
7
8
...
# Bind to all interfaces, or localhost
server.address=0.0.0.0
server.port=8443
server.ssl.key-store=file:/home/joe/keystore.p12
server.ssl.key-store-password=<password of your certificate>
server.ssl.key-store-type=PKCS12
..
2.3.3. Trust the self-signed certificate
-
Extract:
keytool -exportcert -alias selfsigned -keystore keystore.p12 -storetype PKCS12 -file selfsigned.crt -rfc -
Copy it e. g. to MacOS key-chain system certificates and trust it.
2.4. PostgreSQL
2.4.1. Setting up the database
-
Edit
postgresql.conf:max_connections = 50 # (change requires restart) -
createuser -U postgres -P projectforgeas e.g. admin user. -
createdb -U postgres -E UTF-8 -O projectforge projectforgeas e.g. admin user. -
You can drop any existing user and database with:
dropdb projectforgeanddropuser projectforge -
Re-use of existing database (use a dump -→ 5.5 or 5.6)
psql -q -f projectforge_2008-04-02_02-00.sql -U postgres projectforge 2>&1 > log.txt
Recommended settings in postgresql.conf:
statement_timeout =  300000 # 300s
lock_timeout = 300000       # 300s
3. Configuration
3.1. Base directory (application’s home)
ProjectForge® needs a base directory which is set
in application.properties of the web server. By default it
is ${user.home}/ProjectForge . You should prepare this directory for
use-age of ProjectForge®. The following directories will be created
if not exist:
|
Here the lucene indices are stored. If corrupted, delete all files and directories in this directory and re-build data base indices via the web admin console. |
|
For additional fonts used e. g. by the pdf renderers. |
|
For images e. g. by the pdf renderers. |
|
For uploaded files etc. |
3.2. Configuration file application.properties
ProjectForge® is a SpringBoot-Application, you can get more information here.
The format of the file is:
File: application.properties:
here
3.3. Customization
3.3.1. Logo ant title in pdf outputs
At default the pdf outputs file is not present. The logo is placed at
the top right.
Under the configuration menu of the web application you can enter your
organization name. This name will be used as headline for the pdf
outputs.
1
The files must be located in the Resources/Images folder.
File: projectforge.properties:
1
2
3
4
...
projectforge.logoFile=
projectforge.export.logoFile=
...
3.3.2. Customizing i18n translations (since 8.2)
ProjectForge allows you to customize or override any translation text displayed in the user interface. This is useful if you want to adapt terminology to your organization’s specific needs.
To customize translations:
-
Create one or more properties files in the
~/ProjectForge/resourcesdirectory:-
CustomerI18nResources.properties- for default/English translations -
CustomerI18nResources_de.properties- for German translations -
CustomerI18nResources_en.properties- for English translations (explicit)
-
-
Add your custom key-value pairs to override existing translations or add new ones:
1
2
3
4
# Example: Override existing translation
menu.addressbook.title=Contacts
# Example: Add custom translation
myorganization.custom.greeting=Welcome to Acme Corp
-
Restart ProjectForge to apply the changes.
Your custom translations will take precedence over the default translations included in ProjectForge.
To find available i18n keys that you can override, refer to:
-
Main application translations: I18nResources.properties
-
Plugin translations: Search the GitHub repository for
*I18nResources.propertiesfiles in the plugin directories, e.g.:-
plugins/org.projectforge.plugins.banking/src/main/resources/BankingI18nResources.properties -
plugins/org.projectforge.plugins.skillmatrix/src/main/resources/SkillMatrixI18nResources.properties -
And other plugin-specific translation files
-
3.4. Configuration settings (web interface)
Please go to this page for setting different parameters of ProjectForge® such as default time zone etc. You’ll find the documentation there.
3.5. Using ttf fonts for PDF render engine
FOP is used as internal render engine. For enabling True Type Fonts please refer the FOP documentation.
1
2
java -cp build/fop.jar:lib/avalon-framework-4.2.0.jar:lib/commons-logging-1.0.4.jar:lib/commons-io-1.3.1.jar \ +
          org.apache.fop.fonts.apps.PFMReader <path>/<font>.pfm ttf<font>.xml
3.6. HTML formatted E-Mail templates
ProjectForge works with Groovy templates for generating e-mails (as
notifications). You’ll find the templates inside your web archive of the
ProjectForge
installation: plugins/projectforge-business-X.X.X.jar/mail/. You can
modify any template of this directory if needed by simply copying the
file(s) you want to modify into your ProjectForge application dir, which
is also the destination of application.properties:
cp projectforge-business-X.X.X.jar/mail/
Afterwards you can edit this file. ProjectForge looks first in this ProjectForge app directory for loading templates and if not found it uses the resources path.
The templates are internationalized with the locale of the receiving user.
 1
 2
 3
 4
 5
 6
 7
 8
 9
10
11
12
13
14
15
16
17
18
19
20
21
22
23
24
25
26
27
28
<html>
<html>
#INCLUDE{mail/mailHead.html}
<body>
#INCLUDE{mail/mailOpening.html}
<br />
Here you can place content (don't forget to use i18n keys for supporting internationalized e-mails).
...
<br />
<%= pf.getString("link") %>: <a href="${requestUrl}">${requestUrl}</a>
<br />
This is an example of using dynamic data (here a list of positions will be printed):
<table>
  <% for (position in order.positions) { %>
    <tr>
      <th><%= pf.getString("title") %></th>
      <td>${position.title}</td>
      ...
    </tr>
  <% } %>
</table>

#INCLUDE{mail/mailHistoryTable.html}

#INCLUDE{mail/mailClosing.html}
#INCLUDE{mail/mailFooter.html}
</body>
</html>
If you don’t like html-formatted e-mails, you can simply remove all html tags (ignore the html suffix then).
3.7. Configuration of Mobile Enterprise Blogging (MEB)
ProjectForge supports two ways of receiving SMS: e-mail and/or servlet-call. You can use both or at least one of the two ways:
File: application.properties
1
2
3
...
projectforge.receiveSmsKey=*******SECRET********
...
ProjectForges ensures that messages will be imported only once.
3.7.1. Servlet-Call
You can implement a servlet call whenever your system receives an
SMS:
pf.acme.com/secure/SMSReceiver?key=kds8uijkqw6idg&date=20101105171233&sender=01234567&msg=Hello…;
The format of the values are the same as described above. The encoding
should be UTF-8. The key is a communication key and should be configured
in your (see above).
Please deploy the following php script on your Asterisk web server (many
thanks to Thomas Koch for this great work):
 1
 2
 3
 4
 5
 6
 7
 8
 9
10
11
12
13
14
15
16
17
18
19
20
21
22
23
24
25
26
27
28
29
30
31
32
33
34
35
36
37
38
39
40
41
42
43
44
45
46
47
48
49
50
51
52
53
54
55
56
57
58
59
60
61
62
63
64
65
66
67
68
69
70
71
#!/usr/bin/php
<?
# SMS2ProjectForge

$SMS_DIR="/var/spool/asterisk/sms/mtrx/";
$PF_EMAIL="projectforge@change-to-your-domain.de";
$FROM="smsgateway@change-to-your-domain.de";
$PF_URL="https://change-to-your-domain.de/secure/SMSReceiver?key=<change-to-your-key>&date=%s&sender=%s&msg=%s";

function parseFile($file, $recipient) {

  if(!$file)
    return;
  if(is_file($file)) {
    $content = file($file);
  } else {
    print("$file is missing\n");
    return;
  }
  foreach($content as $line) {
    if(preg_match("/oa=(\d+)/", $line, $match)) {
#print("Absender " . $match[1] . "\n");
      $oa = $match[1];
    }
    if(preg_match("/ud=(.*)/", $line, $match)) {
#print("Text " . $match[1] . "\n");
      $text = $match[1];
    }
  }
  if($recipient == "pf") {
    $time = time();
#$mailtext = sprintf("date=%s\nsender=%s\nmsg=%s\n", time(), $oa, utf8_encode($text));
    $mailtext = sprintf("date=%s\nsender=%s\nmsg=%s\n", time(), $oa, $text);
    mail($PF_EMAIL, "SMS", $mailtext, "From: smsgateway <$FROM>");
    $url = sprintf($PF_URL),
        $time,
        $oa,
        urlencode($text));
    $pig = fopen($url, "r");
    # XXX check answer!
    #$ret = stream_get_contents($pig);
  }
  return(1);
}

function getRecipient($file) {
  if(!$file)
    return;
  # pf.2010-05-04T16:46:01-11
  if(preg_match("/(\w+)\.\d\d\d\d-\d\d-\d\d.\d\d:\d\d:\d\d-\d+/", $file, $match)) {
    return($match[1]);
  }
  return;
}

##
# Main
#
$content = array();
if(is_dir($SMS_DIR)) {
  if($dh = opendir($SMS_DIR)) {
    while(($file = readdir($dh)) !== false) {
      if($file != "." && $file != "..") {
        if(parseFile($SMS_DIR . $file, getRecipient($file))) {
          unlink($SMS_DIR . $file);
        }
      }
    }
  }
}
?>
3.8. phone calls and texting with ProjectForge
3.8.1. Phone calls
If configured the users are able to initiate phone calls directly by clicking on a phone number of an address or by entering a name or a phone number in the direct phone call page.
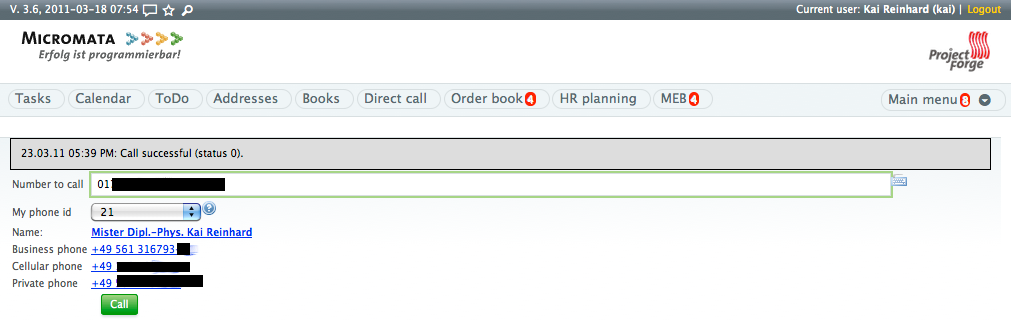
Figure 1: |
You can initiate a phone call by simply clicking on a phone number of an address or by entering a name or number into the number field. |
Please deploy the following php script on your Asterisk web server (many thanks to Thomas Koch for this great work):
File: originatecall.php:
 1
 2
 3
 4
 5
 6
 7
 8
 9
10
11
12
13
14
15
16
17
18
19
20
21
22
23
24
25
26
27
28
29
30
31
32
33
34
35
36
37
38
39
40
41
42
43
<?
# originates call from ProjectForge
# 03/09 by t.koch@micromata.de

$USERNAME = "admin";
$PASSWORD = "secret";

function doCall($source, $target) {
  global $USERNAME, $PASSWORD;
  $socket = fsockopen("127.0.0.1","5038", $errno, $errstr, $timeout);
  if(!$socket) {
    return(1);
  }
  fputs($socket, "Action: Login\r\n");
  fputs($socket, "UserName: $USERNAME\r\n");
  fputs($socket, "Secret: $PASSWORD\r\n\r\n");
  fputs($socket, sprintf("Action: Originate\r\nChannel: Local/%s@intern\r\nContext: intern\r\nExten: %s\r\nPriority: 1\r\nCallerid: %s\r\nTimeout: 8000\r\nVariable: var1=23|var2=24|var3=25\r\nActionID: ABC45678901234567890\r\n\r\nAction: Logoff\r\n\r\n", $source, $target, $source));
  return(0);

  if($debug) {
    while (!feof($socket)) {
      print(fread($socket, 8192));
    }
    fclose($socket);
  }
}

$SOURCE = $_GET{source};
$TARGET = $_GET{target};

if(!is_numeric($SOURCE)) {
  print(2);
  exit(2);
}
if(!is_numeric($TARGET)) {
  print(3);
  exit(3);
}
if(doCall($SOURCE, $TARGET))
  print(1);
else
  print(0);
?>
Please check this servlet manually. It has to be available from your ProjectForge server. Then configure your servlet:
File: application.properties:
1
2
3
4
...
projectforge.telephoneSystemUrl=http://asterisk.yourserver.org/originatecall.php?source=#source&target=#target
projectforge.telephoneSystemNumber=0123456789
...
3.8.2. Texting
If configured the users are able to text by clicking on the SMS symbol of an address or by entering a name or a cell phone number.
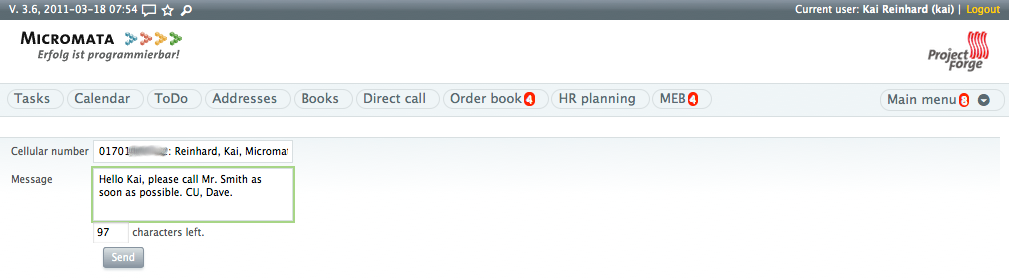
Figure 2: |
You can send text messages by simply clicking on the SMS symbol of an address or by entering a name or cell phone number. |
Please deploy the following php script on your Asterisk web server (many thanks to Thomas Koch for this great work):
File: sms.php:
 1
 2
 3
 4
 5
 6
 7
 8
 9
10
11
12
13
14
15
16
17
18
19
20
21
22
23
24
25
26
27
28
<?
/*
   Texting with ProjectForge and Asterisk
   07.09.2009 by t.koch@micromata.de v1
*/

$NUMBER = $_REQUEST{number};
$MESSAGE = $_REQUEST{message};

if(!is_numeric($NUMBER)) {
  print("2\nwrong destination number");
  return(2);
}
if(!$MESSAGE) {
  print("1\nmissing message");
  return(1);
}
if(strlen($MESSAGE) > 160) {
  print("3\nmessage > 160");
  return(3);
}
$rand = rand(100000, 4000000);
usleep($rand);

# XXX concurrent == maximum number of b channels
system(sprintf("/usr/sbin/smsq '--concurrent=8' '--spool-dir=/var/spool/asterisk/' '--motx-channel=DIALOGICDIVA/contr1/0193010' '--da=%s' '--motx-callerid=<callerid>' '--ud=%s' >/tmp/sms.$rand 2>/tmp/sms.$rand", $NUMBER, $MESSAGE));
print("0\nok");
?>
Please check this servlet manually. It has to be available from your ProjectForge server. Then configure your servlet:
File: application.properties:
1
2
3
...
projectforge.smsUrl=http://asterisk.yourserver.org/sms.php?number=#number&message=#message
...
To use the full functionality of ProjectForge please configure the address book feature. Don’t forget to configure your default country phone prefix in the configuration web page.
3.8.3. PhoneLookupServlet
With the phone lookup servlet a telephony system (such as Asterix) may lookup incoming phone calls:
File: application.properties:
1
2
3
...
projectforge.phoneLookupKey=*******SECRET********
...
3.9. business assessment / BWA
If you work with accounting records (DATEV) you may be want to have
business assessments (BWA in German). The business assessments of DATEV
consists of rows. Each row has a line number (no) and a title (for
displaying). The accountRange defines which DATEV accounts matches the
row. Please note, that a record is assigned to the first row found.
If the priority of a row is not high, the row will not be shown in the
short form of business assessments. The value defines row amounts which
are calculated (see example below).
3.10. SecurityConfig
3.10.1. Secure passwords
Every password is stored in the database as SHA256 hashed password. For reducing brute force attacks several security mechanism are implemented.
3.10.2. Protection against brute force attacks
If the user login failed (via web page or rest service) a penalty time
is given for usernames and IP addresses. For every failed login for an
username the penalty time is increased by one second before the next try
of an username/password combination for that username is allowed.
The same mechanism is used for failed login failures from an IP address
(one second penalty per thousand failed logins).
Please refer the source code for more information.
3.10.3. Salted passwords
Since version 5.3 of ProjectForge® salted passwords are used. This means, that every password is first concatenated with an salt value (random string per user) and then hashed. Therefore so called rainbow tables are useless for attacking passwords. After migrating to version 5.3 every password is salted after login of the user or if the user is changing his password.
3.10.4. Salted passwords with pepper
Since version 5.3 of ProjectForge® the administrator is able to
configure a pepper string in the application.properties. Before
hashing a password the pepper string is concatenated to the salt and
password. Therefore no brute force attack is possible if an attacker has
access to the database dump etc.
Please configure the pepper string like this:
File: application.properties:
1
2
3
...
projectforge.security.passwordPepper=*******SECRET********
....
All passwords are automatically updated after any login of an user (if no pepper and/or salt was yet used for the user’s password) or after any password change.
3.10.5. 2FA (two-factor-authentication)
2FA (two factor authentication) is supported:
-
by using RFC6238, used by e. g. Google or Microsoft Authenticator.
-
SMS if configured
-
Fido2/WebAuthn (e. g. Yubikey)
You may specify the expiry periods of 2FA for different expiry periods URL’s by shortcuts for predefined sets of uri matchers and/or own regular expressions (as uri matchers). A web filter checks for every request, if a 2FA is required and if the last successful 2FA of the current session is not older than the specified expiry period. The timestamp of a successful 2FA is stored in the user’s session as well as in any user’s stay-logged-in-session.
Recoomended example configuration:
File: application.properties:
 1
 2
 3
 4
 5
 6
 7
 8
 9
10
11
...
# Recommended setup
projectforge.2fa.expiryPeriod.minutes1=PASSWORD
projectforge.2fa.expiryPeriod.hours1=ADMIN_WRITE;MY_ACCOUNT;SCRIPT_WRITE
projectforge.2fa.expiryPeriod.hours8=ADMIN;SCRIPT;FINANCE_WRITE;ORGA_WRITE;HR_WRITE
projectforge.2fa.expiryPeriod.days30=HR;FINANCE;ORGA
projectforge.2fa.expiryPeriod.days90=
# Number of days a 2FA is required, when stay-logged-in is used. Without stay-logged-in and given, a 2FA is required
# after every login.
projectforge.2fa.loginExpiryPeriod=30
....
Rules
-
Expression starting with
/means absolute path of uri. -
If expressions do start with
/they will be replaced by their regex:/rs/user→^/rs/user.*: Any uri starting with/rs/useris matching. -
Empty entries means: no 2nd factor
-
Regular expressions and shortcuts should be separated by ';'.
-
Supported shortcuts are
ADMIN,HR,FINANCE,ORGA,SCRIPTING,MY_ACCOUNT,PASSWORDcontaining a bunch of regex. -
You may also use
WRITE:<entity-name>for specifying only all write access calls of an entity (rest calls of React and Wicket actions). Reading of entities / detail view is not affected. -
For entities (also) available in Wicket version, use
/wa/userfor specifying read/write access and/wa/userEditfor specifying detail view and write access. such entities is allowed. For specifying all entity activities, use/rs/<entity-name>instead. -
You may also define own regex, such as:
ADMIN;/wa/report;WRITE:user
Please refer the admin’s web page → configuration → Export 2FA configuration for verifying your configuration.
3.11. LDAP
3.11.1. Requirements
The LDAP must support the following additional schemas (example of slapd.conf of OpenLDAP):
1
2
include /sw/etc/openldap/schema/cosine.schema +
include /sw/etc/openldap/schema/inetorgperson.schema
3.11.2. Configuration
The groupBase setting is only needed in master mode. The managerUser is not needed in simple slave mode. For further information see below.
File: application.properties:
 1
 2
 3
 4
 5
 6
 7
 8
 9
10
11
12
13
14
...
projectforge.ldap.server=
projectforge.ldap.baseDN=
projectforge.ldap.managerUser=
projectforge.ldap.managerPassword=
projectforge.ldap.port=
projectforge.ldap.sslCertificateFile=
projectforge.ldap.groupBase=
projectforge.ldap.userBase=
projectforge.ldap.authentication=
projectforge.ldap.posixAccountsDefaultGidNumber=
projectforge.ldap.sambaAccountsSIDPrefix=
projectforge.ldap.sambaAccountsPrimaryGroupSID=
...
3.11.3. Local (admin) users
Please login by using the stay-logged-in checkbox on the login screen as administrator (no LDAP should be configured). Restart ProjectForge with LDAP configured and use the same browser. You should be logged-in. Please go to the user list and select option local user for every user who should be authenticated against ProjectForge (instead of LDAP) and save them. Now the local users may log-in without LDAP credentials. This is especially use-ful for administrator users of ProjectForge.
3.11.4. LDAP over SSL
openssl s_client -showcerts -connect ldap.acme.priv:636 > ldap.pem Copy
the lines
including -----BEGIN CERTIFICATE----- until -----END CERTIFICATE----- (including)
to a file called ldap.cert. Now you can configure the certificate file
in application.properties or you can import the certificate to your
java keystore. The first solution is independent of your JAVA version
and is recommended first.
3.11.5. ProjectForge as LDAP master
The LDAP master mode is the most tested mode of ProjectForge and is used in production mode at the ProjectForge developer’s company. In this mode, ProjectForge needs a LDAP user with write access to groups and users. The ProjectForge user’s will be synchronized in LDAP. If there is any conflict between LDAP and ProjectForge, the ProjectForge settings are used. The configuration of this mode is simple:
File: application.properties:
1
2
3
...
projectforge.login.handlerClass=LdapMasterLoginHandler
...
-
This LDAP login handler has read-write access to the LDAP server and acts as master of the user and group data. All changes of ProjectForge’s users and groups will be written through.
-
Any change of the LDAP server will be ignored and may be overwritten by ProjectForge.
-
Passwords
After each successful login-in at ProjectForge (via LoginForm) ProjectForges tries to authenticate the user with the given username/password credentials at LDAP. If the LDAP authentication fails ProjectForge changes the password with the actual password of the user (given in the LoginForm). If the user changes his password (my account → change password), the LDAP password will be changed respectively. In LDAP master mode, the user is also able to change his "WLAN/Samba password" (my account → change password). The password entered there, will be written to the LDAP attribute "sambaNTPassword". -
Deactivated users
Deactivated users will be moved to an sub userbase called "deactivated". The e-mail will be invalidated and the password will be deleted. Deleted and deactivated users are removed from any LDAP group. After reactivating the user, the password has to be reset if the user logins the next time via LoginForm. -
Deleted Users
Deleted users will not be synchronized and removed in LDAP if exist. -
New users
New users (created with ProjectForge’s UserEditPage) will be created first without password in the LDAP system directly but with "WLAN/Samba password". Such users need to log-in first at ProjectForge, otherwise their LDAP passwords aren’t set (no log-in at any other system connecting to the LDAP is possible until the first log-in at ProjectForge). -
Modifiing fields in LDAP
ProjectForge does only modify supported fields of known LDAP users. If any modification is done in LDAP of fields and users/groups known by ProjectForge they will be overwritten by ProjectForge during the next synchronization run. If any modification in other fields of LDAP users are done, the should be left untouched by ProjectForge. -
Synchronization
After any modification of any ProjectForge user or group, the synchronization is started for all LDAP users and groups. If no modification is done, the synchronization is done approximately hourly, but only if any user activity is detected in ProjectForge. You can force a synchronization by refreshing all caches (including the UserGroupCache) in the system web page or by restarting ProjectForge. -
Groups and assigned users
Users will be added asuniqueMemberentries in the LDAP groups if also assigned in ProjectForge to the same ProjectForge group.
LDAP entries
See figures 3 and 4 for detailed information of how does ProjectForge stores and expect LDAP fields and object classes.
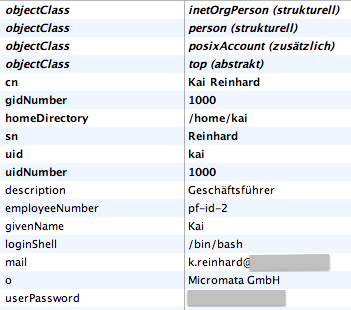
Figure 3: |
ProjectForge uses the fields and object classes shown in
this figure for users. The object class |
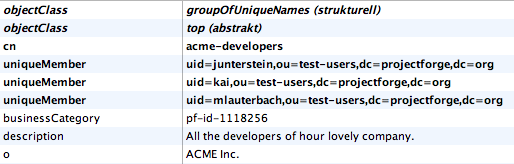
Figure 4: |
ProjectForge uses the fields and object classes shown in
this figure for groups. The field |
Managing POSIX accounts
ProjectForge supports the management of POSIX accounts with the
data uidNumber, gidNumber, homeDirectory, and loginShell.
You can administer the POSIX account data in the UserEditPage after
configuring the application.properties like the above example.
Pleaser refer the tool-tips for further information:
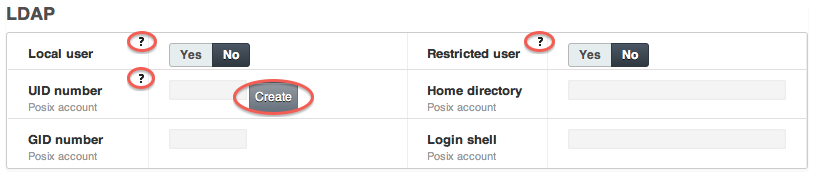
Figure 5: |
ProjectForge is able to manage POSIX accounts in LDAP master mode. |
-
After clicking the Button
createbeside the UID number field ProjectForge will prefill all POSIX account fields:-
The UID number will be the next free number (ProjectForge searches the highest used UID and increments it by one). If no such number found, 1,000 is assumed.
-
The GID number will be preset with the defaultGidNumber configured in
application.properties. -
The home directory will be the prefix
/home/(configured inapplication.properties) followed by the user-name: e. g./home/kai -
The login-shell will be preset with
/bin/bashor any other which is configured inapplication.properties.Don’t forge to save this user by clicking the save or update button on the bottom of the edit page. After changing any of these POSIX account fields the LDAP entries are update immediately.
-
-
ProjectForge presets a new UID number automatically (see above).
-
ProjectForge assures that no UID number is given twice.
-
Every LDAP entry gets the
object-classposixAccountonly if the POSIX account data were created in ProjectForge for this user.
3.11.6. Managing Samba accounts
File: application.properties:
1
2
3
4
...
projectforge.ldap.sambaAccountsSIDPrefix=
projectforge.ldap.sambaAccountsPrimaryGroupSID=
...
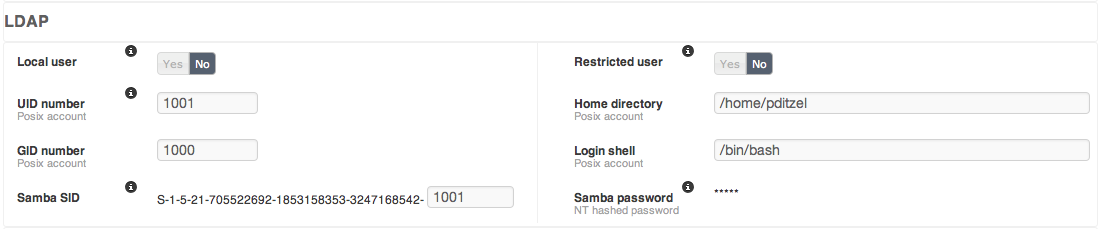
Figure 6: |
ProjectForge is able to manage POSIX and Samba accounts in LDAP master mode. |
-
After clicking the Button
createbeside the UID number field ProjectForge will prefill all SAMBA account fields:-
The UID number will be the next free number (ProjectForge searches the highest used UID and increments it by one). If no such number found, 1,000 is assumed.
-
The GID number will be preset with the defaultSambaPrimaryGroupSID configured in
application.properties. -
Parallel usage with POSIX, which is recommended:
Please click the 'create' button near to the UID of the POSIX account, the suffix of SAMBASID will be the same UID. ProjectForge’s tries first to get the same UID for SAMBA as for POSIX if no conflict was found.Don’t forge to save this user by clicking the save or update button on the bottom of the edit page. After changing any of these Samba account fields the LDAP entries are update immediately.
-
-
Every LDAP entry gets the
object-classsambaSamAccountonly if the Samba account data were created in ProjectForge for this user.
3.11.7. ProjectForge as LDAP client
This LDAP login handler acts as a LDAP slave, meaning, that LDAP will be
accessed in read-only mode. There are 3 modes
available: simple, users and users-groups. The configuration of
this mode is simple:
File: application.properties:
1
2
3
...
projectforge.login.handlerClass=LdapSlaveLoginHandler
...
Simple mode
The simple mode is assumed if no ldap managerUser is given in the application.properties.
-
Simple means that only username and password is checked, all other user settings such as assigned groups and user name etc. are managed by ProjectForge.
-
No ldap user is needed for accessing users or groups of LDAP, only the user’s login-name and password is checked by trying to authenticate!
-
If a user is deactivated in LDAP the user has the possibility to work with ProjectForge unlimited as long as he uses his stay-logged-in-method! (If not acceptable please use the normal user mode instead.)
-
For local users any LDAP setting is ignored.
Users mode
The normal user mode is assumed if a LDAP managerUser is given in
the application.properties.
-
Normal means that username and password is checked and all other user settings such as user name etc. are read by a given LDAP manager user.
-
If a user is deleted in LDAP the user will be marked as deleted also in ProjectForge’s data-base. Any login after synchronizing isn’t allowed (the stay-logged-in-feature fails also for deleted users).
-
For local users any LDAP setting is ignored.
-
All known LDAP user fields of the users are synchronized (given name, surname, e-mail etc.).
Users-groups mode
This mode is not yet implemented, the users-mode is used instead.
3.11.8. ProjectForge without LDAP
You can also use PF without LADP.
File: application.properties:
1
2
3
...
projectforge.login.handlerClass=LoginDefaultHandler
...
3.12. Troubleshouting
3.12.1. NullPointerException on pages with diagrams und Linux
If you will receive exceptions while calling pages with diagrams such as under menu project management → my statistics:
Caused by: java.lang.NullPointerException
        at java.desktop/sun.awt.FontConfiguration.getVersion(FontConfiguration.java:1262)
you probably use JDK11+ and the linux package fontconfig isn’t installed. Please install this package and restart ProjectForge.
4. Maintenance
4.1. Updating by simple clicks
ProjectForge provides automatically updates as built-in scripts with every new version. Refer the migration guide for required, manual changes.
4.2. Re-indexing the database
Should be done after setup: Use the administration menu.
4.3. Analysing tools
Useful commandes are:
 1
 2
 3
 4
 5
 6
 7
 8
 9
10
11
12
13
14
15
16
17
18
19
...
projectforge@vprojectforge:~$ jps
19533 Bootstrap
2261 Jps
projectforge@vprojectforge:~$ jstack 19533
2008-02-14 09:58:28
Full thread dump Java HotSpot(TM) 64-Bit Server VM (1.6.0_03-b05 mixed mode):

"Attach Listener" daemon prio=10 tid=0x00002aaaf4a6e800 nid=0x8fa waiting on condition [0x0000000000000000..0x0000000000000000]
   java.lang.Thread.State: RUNNABLE

"http-8443-10" daemon prio=10 tid=0x00002aaaf4a94800 nid=0x716c in Object.wait() [0x0000000041f47000..0x0000000041f47e40]
   java.lang.Thread.State: WAITING (on object monitor)
  at java.lang.Object.wait(Native Method)
  - waiting on <0x00002aaaee262530> (a org.apache.tomcat.util.net.JIoEndpoint$Worker)
  at java.lang.Object.wait(Object.java:485)
  at org.apache.tomcat.util.net.JIoEndpoint$Worker.await(JIoEndpoint.java:416)

...
4.4. XML-backup and restore and data-base migration ( BUG -→ We guarantee no guarantee, but work on the solution of the problem )
ProjectForge supports the import and export of its whole data-base as XML. It’s independent from the data-base (Hypersonic, PostgreSQL, MySQL, Oracle etc.). You can choose this method to migrate your data-base from one data-base to any other data-base supported by ProjectForge.
4.4.1. Export
It’s possible to export an XML-Dump from your data-base using the system administration dialogue (web). This backup contains all data of ProjectForge in one zipped xml file.
4.4.2. Import
-
First you need a fresh data-base (without any tables and data).
-
Afterwards start ProjectForge with the connection data to your new data-base.
-
Upload the XML or zipped XML file inside the setup-page (which is shown automatically in your web-browser for empty data-bases). Leave any other input fields such as password etc. untouched.
-
Press the upload button.
-
Watch the results in the log messages. ProjectForge will verify each single entry by comparing each object of the XML file with the imported data-base objects (each single field of every object is compared.) Any inconsistency or difference is shown in the log file.
-
Now you can login into ProjectForge.
4.4.3. Limitations
The limitation is the web servers memory. It’s planned to support very large ProjectForge data-bases using different xml files. Please request this feature e. g. inside the help forum if needed. For migration without changing the data-base vendor the data-base specific dump and restore mechanism are recommended for large data-bases.
Hint
Please note: After an import of a dump file into a new ProjectForge installation all primary keys are changed! ProjectForge ensures the integrity of all data including the history entries.
4.5. Backup
All datasets of ProjectForge® will be stored in the underlaying
database (e. g. PostgreSQL).
You should install an Unix cron script making frequently a backup of the
database. A dump of containing table entries as SQL statements for
PostgreSQL is possible by using:
pg_dump -D -U projectforge -f pf_dump_`date '+%Y-%m-%d_%H-%M'`.sql |
4.6. Restoring a backup
4.6.1. Data base
1
psql -q -f projectforge_2008-05-12_02-00.sql -U postgres projectforge 2>&1 > log.txt
For further details concerning dropping and creating a new data base.
Don’t forget to create indices (thru admin web page)!
Hint
If you want to use productive data in your develepment system for testing, it’s recommended to set all e-mail addresses of the users to your developers e-mail. Also all passwords can be easily set to
test123if you user following sql statement in your test database (not productive!):
1
update t_pf_user SET password='SHA\{BC871652288E56E306CFA093BEFC3FFCD0ED8872}', email='m.developer@acme.com/';
4.6.2. JCR repository
The JCR repository contains all uploaded files (contracts, orders etc.). The file of the data transfer boxes is not included (it’s normally to large for backup). The data transfer boxes are used for exchanging very large files between users and/or customers.
For restoring a JCR backup, please refer the file backupReadme.txt inside the backup zip file.
If you have a corrupted JCR repository or if you want to make a full backup, refer backupReadme.txt as well. You will also find the readme here: github.com/micromata/projectforge/blob/develop/projectforge-jcr/src/main/resources/backupReadme.txt.
4.7. Automatical backup
4.7.1. Backup script
Install crontab entry as user projectforge on your ProjectForge® server starting the following script:
File: pforgebackup.sh:
 1
 2
 3
 4
 5
 6
 7
 8
 9
10
11
12
13
14
15
16
17
18
19
20
21
22
23
#!/bin/bash

PGSQL_DIR=/usr/bin
BACKUPDIR=/home/projectforge/backup
BASENAME=projectforge PASSWD=...

echo Starting backup of ProjectForge ...
BACKUPFILE=$BACKUPDIR/${BASENAME}_`date '+%Y-%m-%d_%H-%M'`.sql

echo Using filename $BACKUPFILE ...
echo Exporting ...
$PGSQL_DIR/pg_dump -D -U projectforge -W $PASSWD -f $BACKUPFILE

echo Zipping backupfile ...
gzip $BACKUPFILE

# For using scp for remote backup:
#scp $BACKUPFILE <user>@backup.mydomain:backup/

echo Deleting backups older than 14 days
find $BACKUPDIR -mtime +14 | xargs rm

echo Backup of ProjectForge finished.
For allowing pg_dump without prompting password (if set), you can add
the following line to:
File: pg_hba.conf:
1
local projectforge projectforge ident sameuser
4.7.2. Adding crontab
Adding following entry to the Unix crontab:
1
2
# run every day at 2:00 am +
0 2 * * * /home/projectforge/bin/pforgebackup.sh
4.7.3. Remote backup
For remote backup via scp you need to use key authorization:
-
Generate keys (using empty password) ssh-keygen
-
Copy your public key, e. g.
identity.pubto your backup server. -
Add this key on the backup server to the authorized keys.
4.7.4. Polling remote backup
For security reasons it’s also possible to get the backup files from the ProjectForge® server with a cronjob starting e. g. one hour later:
File: pforgePollBackup.sh:
#!/bin/bash
SERVER=projectforge.mydomain
DIR=/home/projectforge/backup
REMOTE_DIR=backup REMOTE_USER=projectforge
rsync -avz -e "ssh -P" -C $REMOTE_USER@$SERVER:$REMOTE_DIR $DIR
In that case you have to generate ssh key on your backup server and to
add it to the authorized keys on your ProjectForge® server.
Add the following entry to your crontab on the backup server:
# run every day at 3:00 am 0 3 * * * /home/projectforge/bin/pforgePollBackup.sh
4.8. Monitoring
You may monitor the login page with your monitoring tool (such as Nagios). If ProjectForge® is up and running and is full available the following comment is included in the login page:
1
<-- ProjectForge is alive. -->
If ProjectForge® isn’t full available the following html comment is embedded:
1
<-- ProjectForge is not full available (perhaps in maintenance mode or in start-up phase). -->
4.9. Scheduler
4.9.1. Data base search index
The re-index job starts every night at 4 AM (UTC). If an error occurs an e-mail is sent to the admin e-mail addresses configured via web administration. If not configured, no e-mail is sent.
4.10. Uninstalling ProjectForge
You only need to delete the Jar-File and the working directory you’ve chosen / configured. If you’re not sure, where ProjectForge’s working directory is located, please restart ProjectForge and see for the directory in the log output or configuration tab of the standalone version.
Hint
Please note: If you delete the working directory, all your data base entries are deleted as well!
4.11. Security improvements
4.11.1. Fail2ban
LoginDefaultHandler : User login failed:
LoginDefaultHandler[ \t]+\: User login failed\:
5. Plugins
Some plugins which are part of the ProjectForge web app but not automatically enabled are described here.
The plugins-jar must be in another folder(plugins) next to the ProcetForgeJar.
The plugins are managed under Administration -→ Plugins in the ProjectForge web app. After the activation, they have to restart ProjectForge.
5.1. Liquidity planning
5.1.1. Description
This plugins supports the cash flow forecast for a very easy to use liquidity planning. Please refer the UserGuide for further information
5.2. Software license management
5.2.1. Description
In most companies you’ve to deal with lots of Software and license keys. This plugin allows administrators and users to organize license keys:
-
Every user is able to add a Software entry with license keys.
-
The administrator is able to view and edit all license keys.
-
Only users which are assigned to a Software entry (owners) are able to see the license key.
-
The history of every entry allows to track license usage over time by the users.
-
The history of changes is only visible for administrators and software owners.
Planned features are:
-
Upload of license files.
-
Restricted entries (owners are only assignable by administrators).
5.3. ExtendEmployeeData
5.3.1. Description
This plugin supports the HR processing of the employee data as well as in the monthly work with the employment office.
The new menu items are located in the HR menu.
5.3.2. List management
-
Under the menu item list maintenance, you can carry out mass changes on all data records in your system. You only have to select one category and then you can change it for all records.
Furthermore, an Exel export of the selected category can be used to change the data offline in Exel. ( File format must be .xls ) -
Under the menu item list maintenance import you can import the exported and changed data quickly and easily.
5.3.3. Paying office
-
You can export all available data for a month for the paying office in the menu item paying-office-export.
-
In the paying-office-i#mport menu, you can import the columns for salary and remarks from [.short_text]#paying office to PF.
5.3.4. Configuration
-
Here you can create special payments and perks that apply to all employees. These records are always kept in time.
-
Furthermore, you can adjust the headings of the [.short_text]#paying-office-i#mport here.
5.4. IHK Export
5.4.1. Description
Export of working hours for the IHK
5.5. Skillmatrix
5.5.1. Description
Capture and represent the skills of the employees